

For general feedback about the game.
Steam SupportVisit the support site for any issues you may be having with the game or Steam.

At the end of the day, the Pyromania update is a celebration—not just of Team Fortress, but more importantly of you, the TF community, and even more importantly than that, of us, the TF blog post writers, and how great yesterday's blog post was. That Men Without Hats material was a career high. In fact, we decided to never touch this blog again in the hope that it might be preserved in a perfect state for future generations.
You’re probably wondering, then, why we’re crapping up the blog with the crummy words you’re reading right now. Well, if you thought writing blog posts barely qualifies as a job, it turns out not writing them is apparently a lot worse. So as an alternative to getting fired, welcome to Pyromania Day Two's blog post, which we've chosen to use as a moment of quiet reflection on the stellar comedic heights we hit yesterday. We've also only got one more day until Pyromania goes live, exploding into a fireball of new item sets, a new game mode, and of course, Meet the Pyro.
You read that right (presumably): the long-awaited final Meet the Team short, Meet the Pyro, is dropping in less than three days, and we decided to assemble a massive update to celebrate it.

That only left the issue of what to call the update. Luckily, at the very moment we were thinking about it, someone turned on the radio. Guess what song was on? That's right: 'Safety Dance'.
"That's a pretty catchy song," we said. "Who sings that?" Well, we don't want to upset you, so we won't type it here, but suffice it to say the band that wrote 'Safety Dance' has the most unthinkably offensive name we've ever heard.
Then 'Rock of Ages' came on, off Def Leppard's album Pyromania, so we turned off the radio because it wasn't helping. Suddenly, no thanks at all to music, we came up with the name on our own: The Pyromania Update.
Day One of Pyromania reveals Doomsday, a new map with a brand new game mode that lets you relive one of the darkest days in TF history. It's all pretty heartwrenching, until you discover you'll get achievements, which are also detailed in today's update.
Keep your eyes open, folks. We'll be announcing a bunch of new stuff this week, right up until the premiere of Meet the Pyro this Wednesday.
Mmmmph mmmmph, mmmmm mmmmmp mmmmmph. Mmmmmph mpm! Mmmmmph mph mm! Hm mmmmmph, hmmmmph mm mmmmmph mmmmmph!
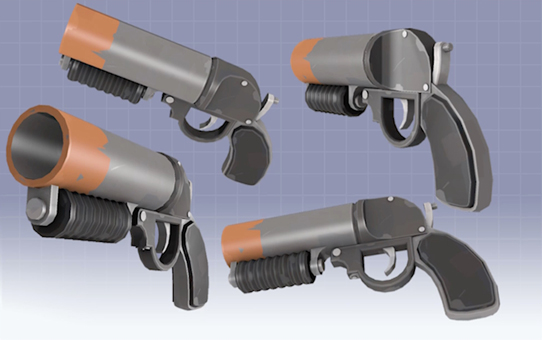
A lot of you have been asking how all those nifty weapons get made for TF2. Well, you’re in luck. TF2 workshop contributor
Jalcober
volunteered to talk you through exactly how he does it in his own words, tracking the progress of a pretty sweet Pyro gun he made called the Scorch Shot. But why not let him explain it himself:
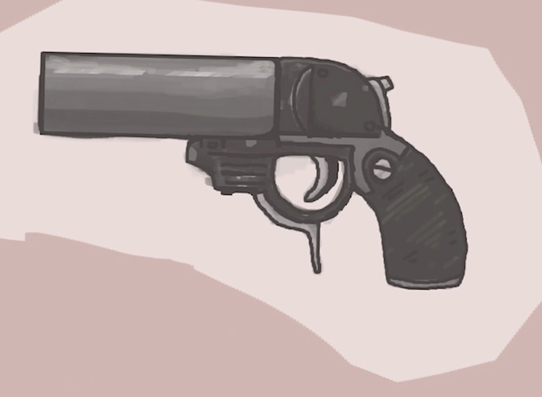
"I started out with this excellent concept sketch from my fellow Steam Workshop contributor
[Square]."
"Next, I created an image plane with the concept art on it and placed a cylinder primitive over it."
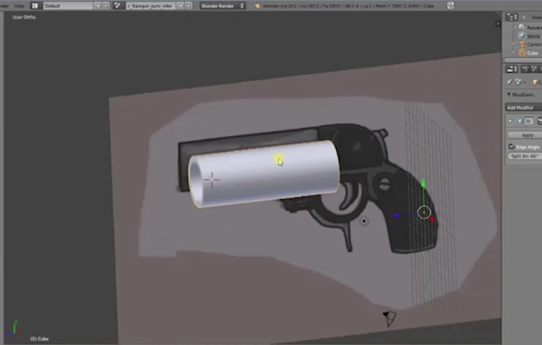
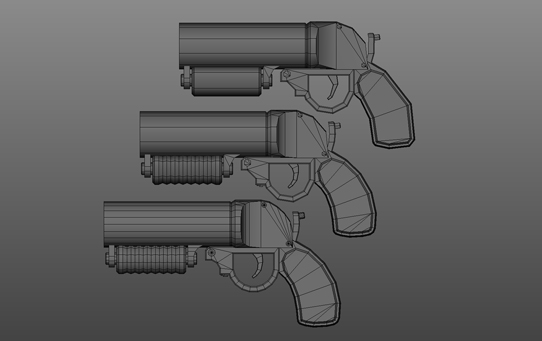
"Since I was hoping the gun would get accepted into TF2, I wanted it to match the size, style and polycount of the existing items for the Pyro. Luckily, I found an importer that brings Valve game assets into Blender (an open source 3D modeling tool), so I could load the Pyro’s existing flare gun up next to mine."
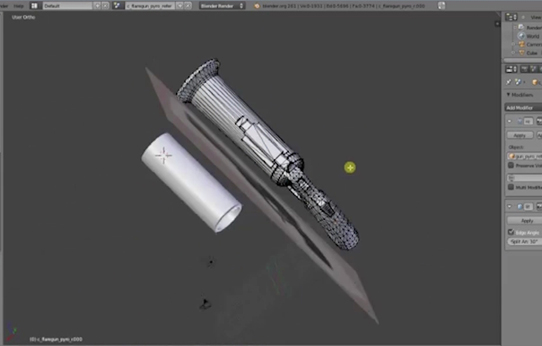
"Since I wanted the gun to feel like it was assembled from parts in the TF2niverse, I decided to make each piece separately. Each 'part' started out as a flat polygon that I traced over the concept art on an image plane."
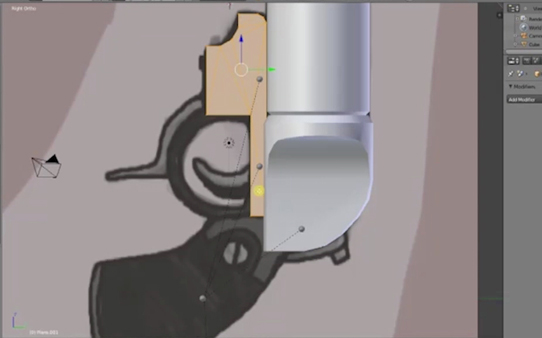
"Next, each part got extruded and adjusted for thickness."
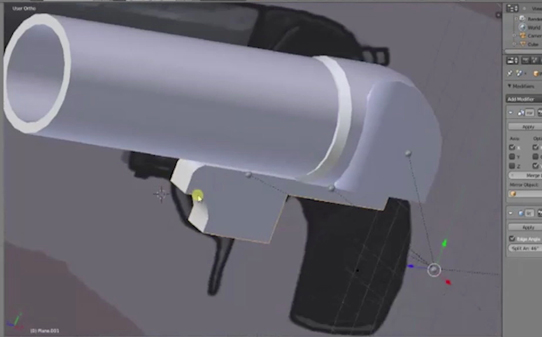
"I repeated this process to complete the rest of the trigger assembly."
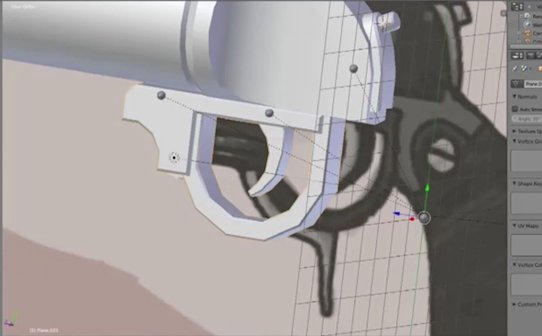
"It's easier to build half a model and then mirror across the centerline than it is to build the whole thing."
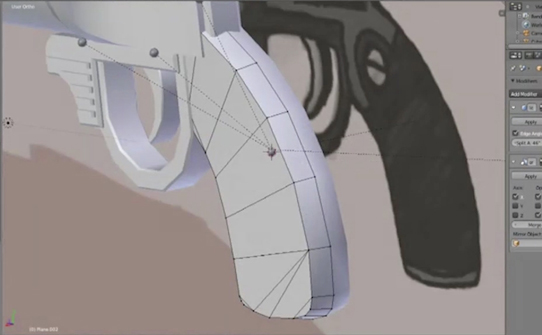
"I did a little prep work on the facet of the grip padding before extruding it, so I wouldn't have to tweak all the new extruded vertices. (Doing a little edge work before extruding can save a lot of time.)"
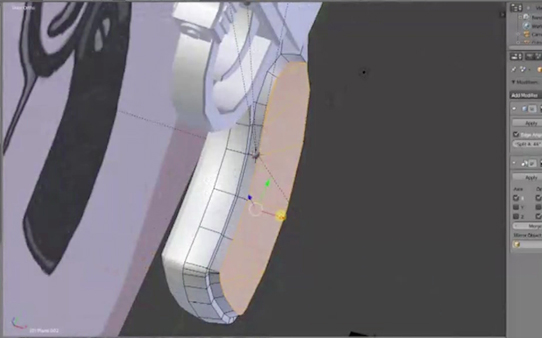
"I decided to add some smaller details the same way."
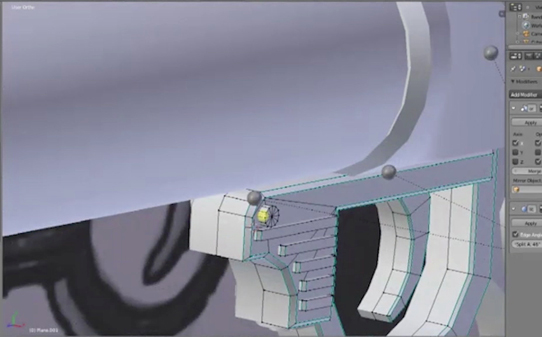
"Next, I added a cylinder to create the barrel grip and the mount."
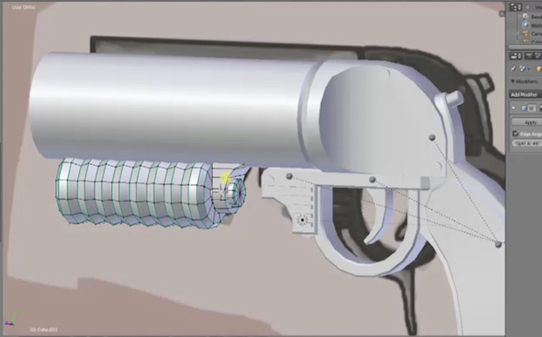
"With all the pieces complete, I created a flattened UV layout so that I could paint directly onto the model in Photoshop."
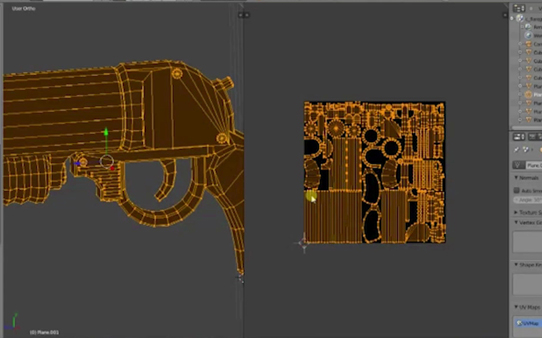
"Before moving over to Photoshop, I baked the ambient occlusion lighting into the texture so I'd be able to tell which parts were which."
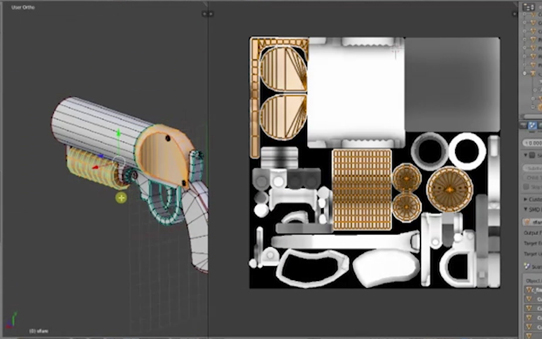
"Now I was ready to start painting the color texture map."
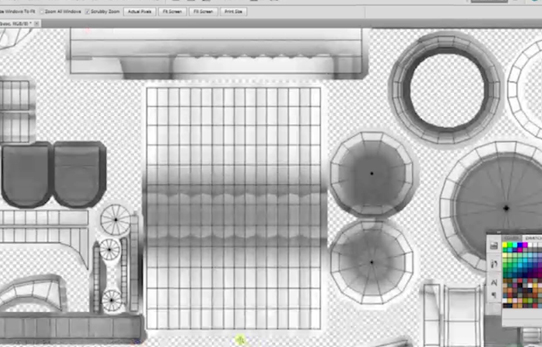
"Using [Square]'s concept art as a guide, I selected the regions of the 3D model that I wanted to be darkened."
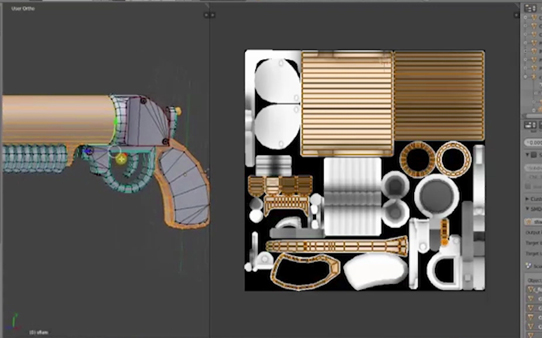
"I then lasso-selected those same regions in Photoshop and created a layer underneath the ambient occlusion layer. I then set the ambient occlusion layer to "Multiply" so that it only darkened my color layer underneath. Any part of the ambient occlusion layer that was white then became transparent."
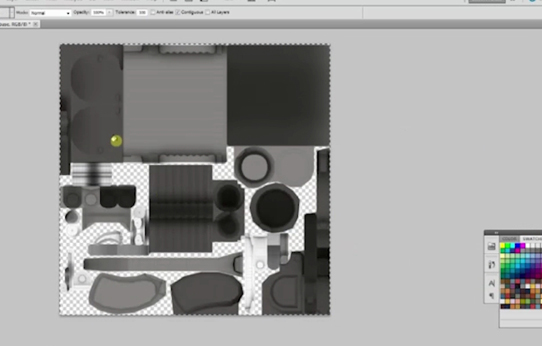
"Back in Blender, I turned off all the lights in the 3D viewport so I could see how my unlit texture was looking on the model while simultaneously painting it in Photoshop."
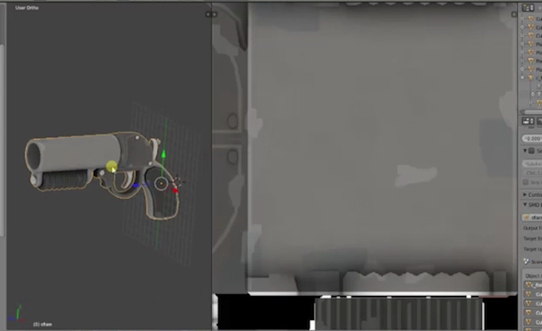
At this point, I took a screenshot of the gun in the 3D viewport and did a Photoshop paintover. This let me ignore the polygons and make broad changes with a Brush Tool without having to worry about the 3D scene complexity. When I was happy, I then merged these changes back onto the model in 3D. (I had to rebake the ambient occlusion layer because I'd moved the screws.)
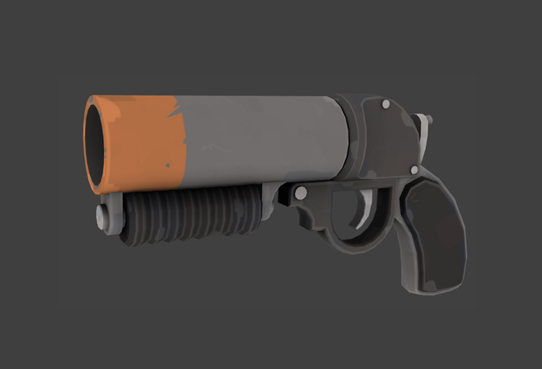
"Next, I compiled the model and tested it out in-game by using the item test map"
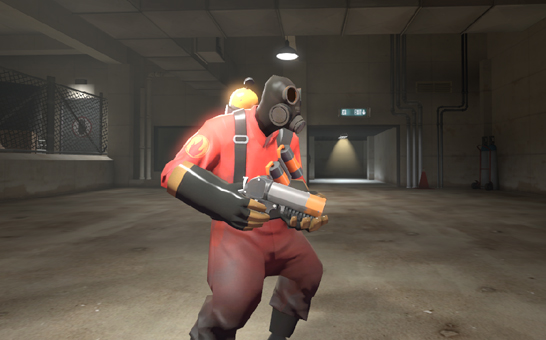
"Lastly, I published my item to the Steam Workshop and crossed my fingers!"
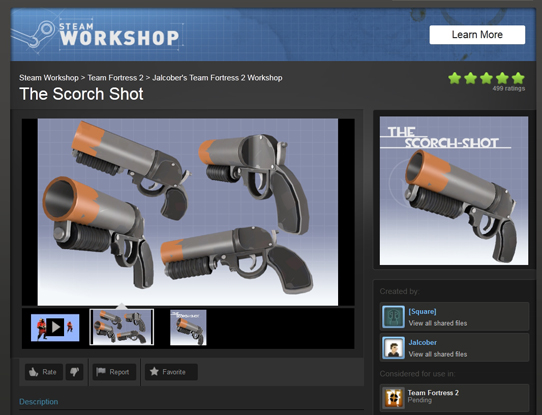
Thanks Jalcober! Now back at Valve, those of us in the TF Team are always reviewing items in the Workshop, and we thought Jalcober's flare gun model would be a great fit for the universe. We got in touch with Jalcober and asked if he could make some lower levels of detail (LODs) to help keep the game running smoothly on low-end computers. We also asked that he resubmit the item using the Itemtest Wizard file structure to make it easier for us to review the submission.
From here, the team brainstormed some ideas for gameplay that wouldn't unbalance the game, but would hopefully still be a fun new addition for players. We created a new particle system and began playtesting it in-game.
And that's how a concept becomes a working gun in Team Fortress 2. In fact, look for it in an upcoming update!
To learn more about getting involved in creating items for TF2, head over to the new Discussions section of the Steam Workshop! See you on the cap point!

The first step of any map-making process at Valve starts with figuring out what the TF2 community would most like to play. The idea for "Gorge", for instance, came from a brainstorming session to see if we could develop an alternative to the standard Attack/Defense map. The competitive community typically avoids Attack/Defense maps for several reasons, one of which is their potentially long time limits. We thought that was an interesting variable to dig into - could we develop a shorter-form Attack/Defense map? The community overall had also been asking us to make more five-point CP maps, so we thought there was an opportunity to try out a short Attack/Defense map that could then be turned into a five-point CP map via mirroring down the road.
With the goal in place, the next place we turn to is a simple pad of paper, where we start scribbling down ideas.

The Scribble
The original concept for "Gorge" was that it would only have two points - essentially a single stage separated by a gorge running through the middle of it and connected by a bridge. Two key structures on either side of the gorge would house the points. We knew that we wanted to have trucks and containers as decoration, to suggest a shipping and receiving point for a weapons manufacturing factory.

The Combat
At this point all we had was the goal (short-form Attack/Defense map), a rough theme (weapons factory) and a basic layout of the gorge idea. As we started developing the scribbles into a working map, though, other requirements to make the map a better playable experience started to suggest themselves. One of the first scribbly drawings shown below suggested one large contiguous space, for instance, with some loosely established broad stroke structures to give it a sense of scale. Building out the map from the drawing, though, we realized we didn't have any clearly defined combat spaces. The map needed to be segmented a little more deliberately.

This second drawing shows some early concepts at a bigger building that created more of a combat arena for players.

We also started fleshing out some of the routes the player could take, with three exits from the spawning area at the front, left and right that opened onto a basketball-sized court. At this point we also started playing with the idea of an elevated bridge, similar to the covered bridge from Granary, with its sneaky upper route that players could drop down from.
The Playtesting
At Valve, we playtest iteratively and often. After we'd built a rough but playable Hammer map of "Gorge", we playtested it as a group, then met afterwards to discuss it. What worked? What didn't? After playtesting "Gorge", it became immediately apparent that a lot of the elements we thought would be interesting at concept stage simply weren't all that great in execution. At this stage, we'll commit to small iterative changes, play, discuss, and repeat. What would happen if we used more terrain? If we added a roadway? If we added a sweeping side route that could be used for flanking? By experimenting iteratively with every new idea, we're able to make demonstrable incremental improvements without slowing the team down on risky, time-consuming resets.
For example, one thing we realized after playtesting was that we needed to better define the purpose of the gorge in the map. Initially the gorge was deep, with steep walls and only one exit—sort of like a penalty box or a hazard—but that ended up being pretty dull. As we gradually discovered through iteration and playtesting, it was far more interesting from a player perspective to be able to flow through the space as a whole.
As we kept trying new ideas, the map started to take shape. Some vague ideas didn't work out so well. Others continued to grow almost like seeds.
The Cap

At first we didn't know much about the cap point. We had a rough scale and placement for it, but didn't know yet how it would affect the play experience. As we started developing the map, we started sketching cap ideas within the rough space we'd assigned for it.

One question that kept nagging at us was: How could we limit line of sight? This would be the final cap point (that would later become the pit with the back flowing route). If the defender came out of spawn there would be stairs and BLU could attack from above. We needed upper- and mid-battle grounds.

We also needed to determine whether the cap would be elevated or sunken. It started elevated, but after playtesting it became clear that a sunken pit worked better.


With players coming from both sides in a symmetrical map, the elevated point can often work better. But with "Gorge" being an asymmetrical map, there was something more interesting about everyone sort of dog-piling into that pit and slugging it out in there.

Once we were playtesting the hammer map on a regular basis, we reached a point where drawings stopped being all that useful. For me, drawings are a great place to start at a concept stage: Rough out the bones of an idea until you've got a working map in Hammer, then iterate from there. (It wasn't until we were inside the structures and needed to flesh out the interior spaces that we started drawing again.) There are many different approaches, of course, but working back and forth between the idea space and the execution space has always worked best for me. Start with a rough concept sketch; build the basic blocks in Hammer; take the idea to an evolved concept sketch; integrate the evolved sketch back into the map; then lots and lots of iteration and playtesting.
Want more? Check out our walkthrough of how "Viaduct" got made here.